Nobody talks about the floor until it fails.
That’s been my experience across years of laboratory design projects … and it’s not just floors. Walls, ceilings, countertops, fume hoods. The interior finishes of a laboratory are among the most consequential decisions made in the design process, and they’re almost always overshadowed by the bigger conversations: mechanical systems, structural requirements, equipment layouts. Finishes get specified, installed, and forgotten until they don’t perform, or until a renovation reveals what years of use (and misuse) have done to them.
I recently presented on this topic at the annual Lab Design Conference, along with Matthew Magro from Bonitz, and the response was telling. Lab owners, facility managers, and designers packed the room. Likely not because finish systems are glamorous, but because everyone in that audience had a story. A floor coating that delaminated after six months. Ceiling tiles that turned black with mold. A countertop that did not withstand the chemicals planned for it.
This post is a distillation of those lessons. It won’t tell you there’s one right answer because there isn’t. What it will do is help you ask better questions before you commit.
A NOTE ON STANDARDS
Before we dive into materials, it’s worth acknowledging that laboratory finish selection doesn’t happen in a vacuum. To the best of our knowledge there are no defined standards. However, two documents in particular shape what’s appropriate: the NIH Design Requirements Manual (DRM) and the CDC/NIH Biosafety in Microbiological and Biomedical Laboratories (BMBL). While these set the baseline for what finishes are acceptable at various biosafety levels, they are broad standards and would not apply to all laboratory projects.
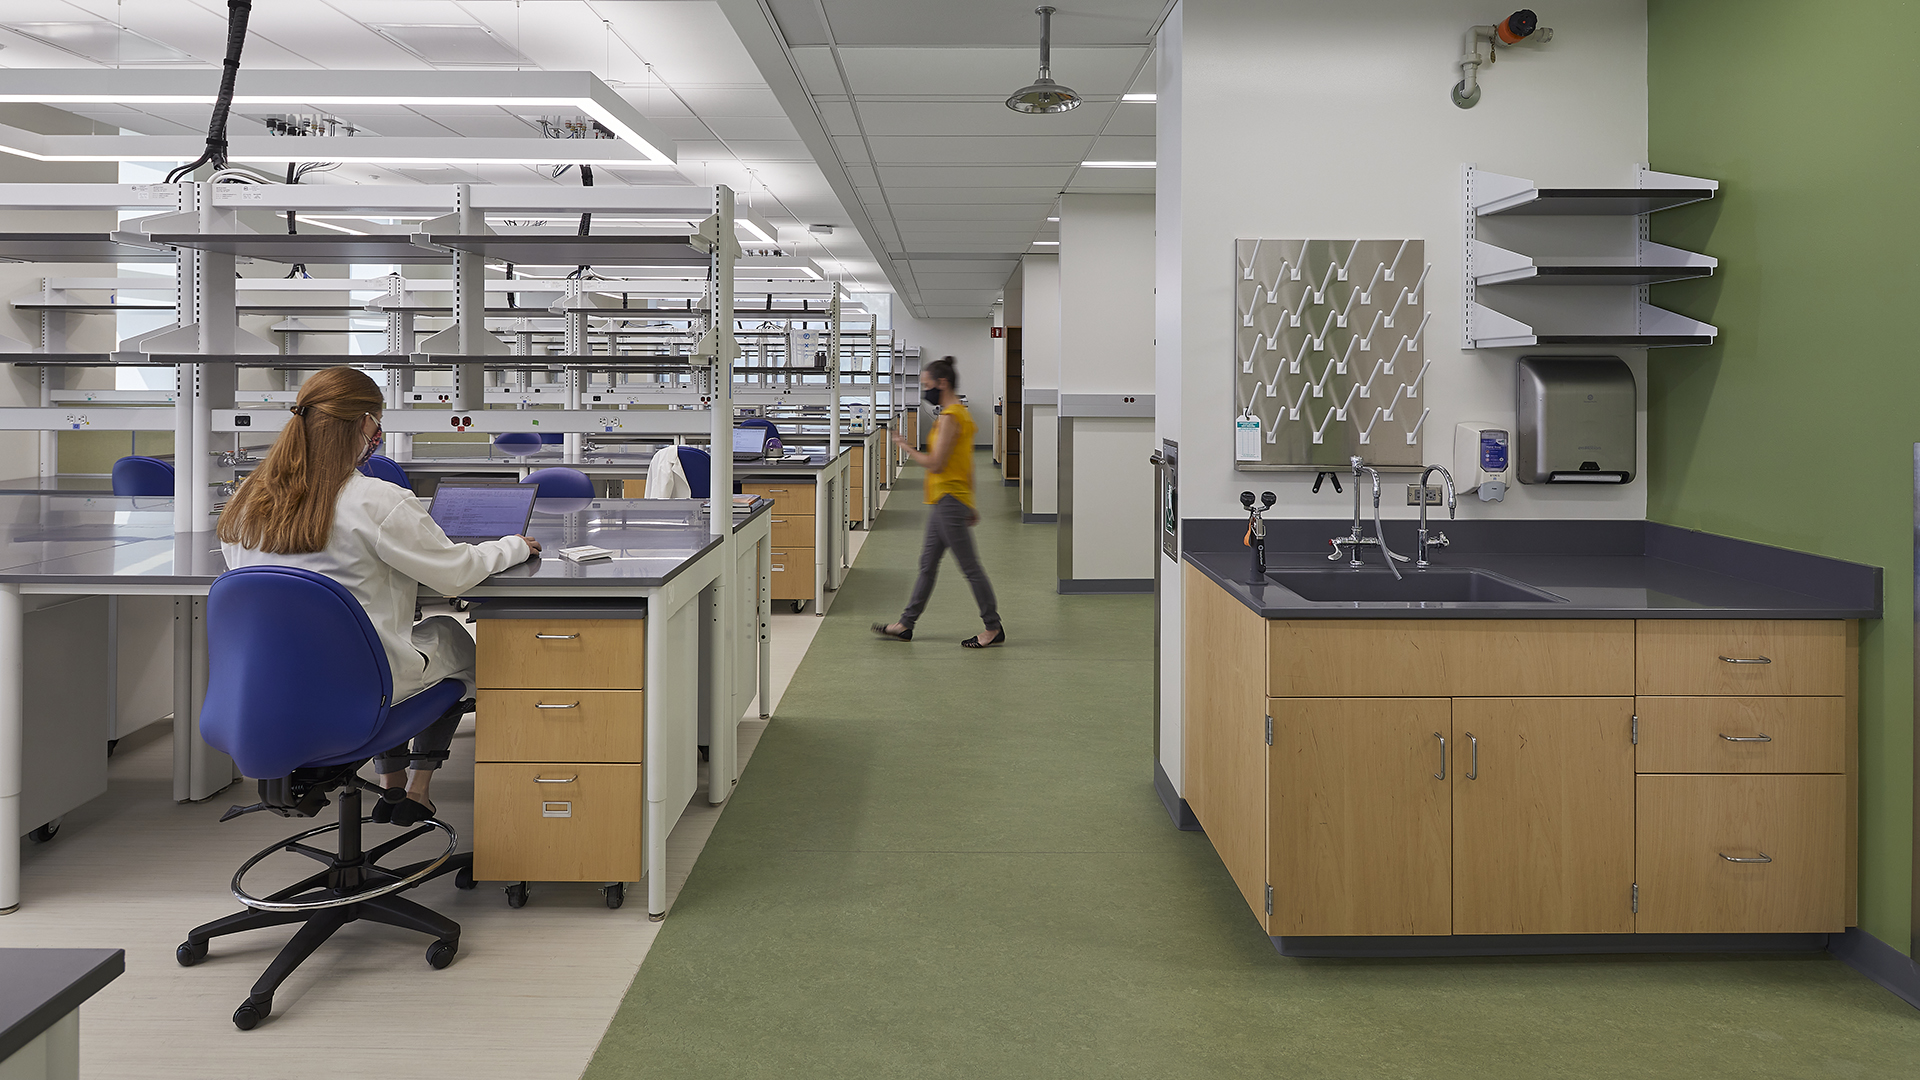
FLOORS: THE SURFACE THAT WORKS THE HARDEST
Walk into a laboratory and the floor is the first thing taking a beating. The floor sees it all: spills, rolling loads, chemical exposure, daily cleaning. Here’s how the most common systems hold up in the real world.
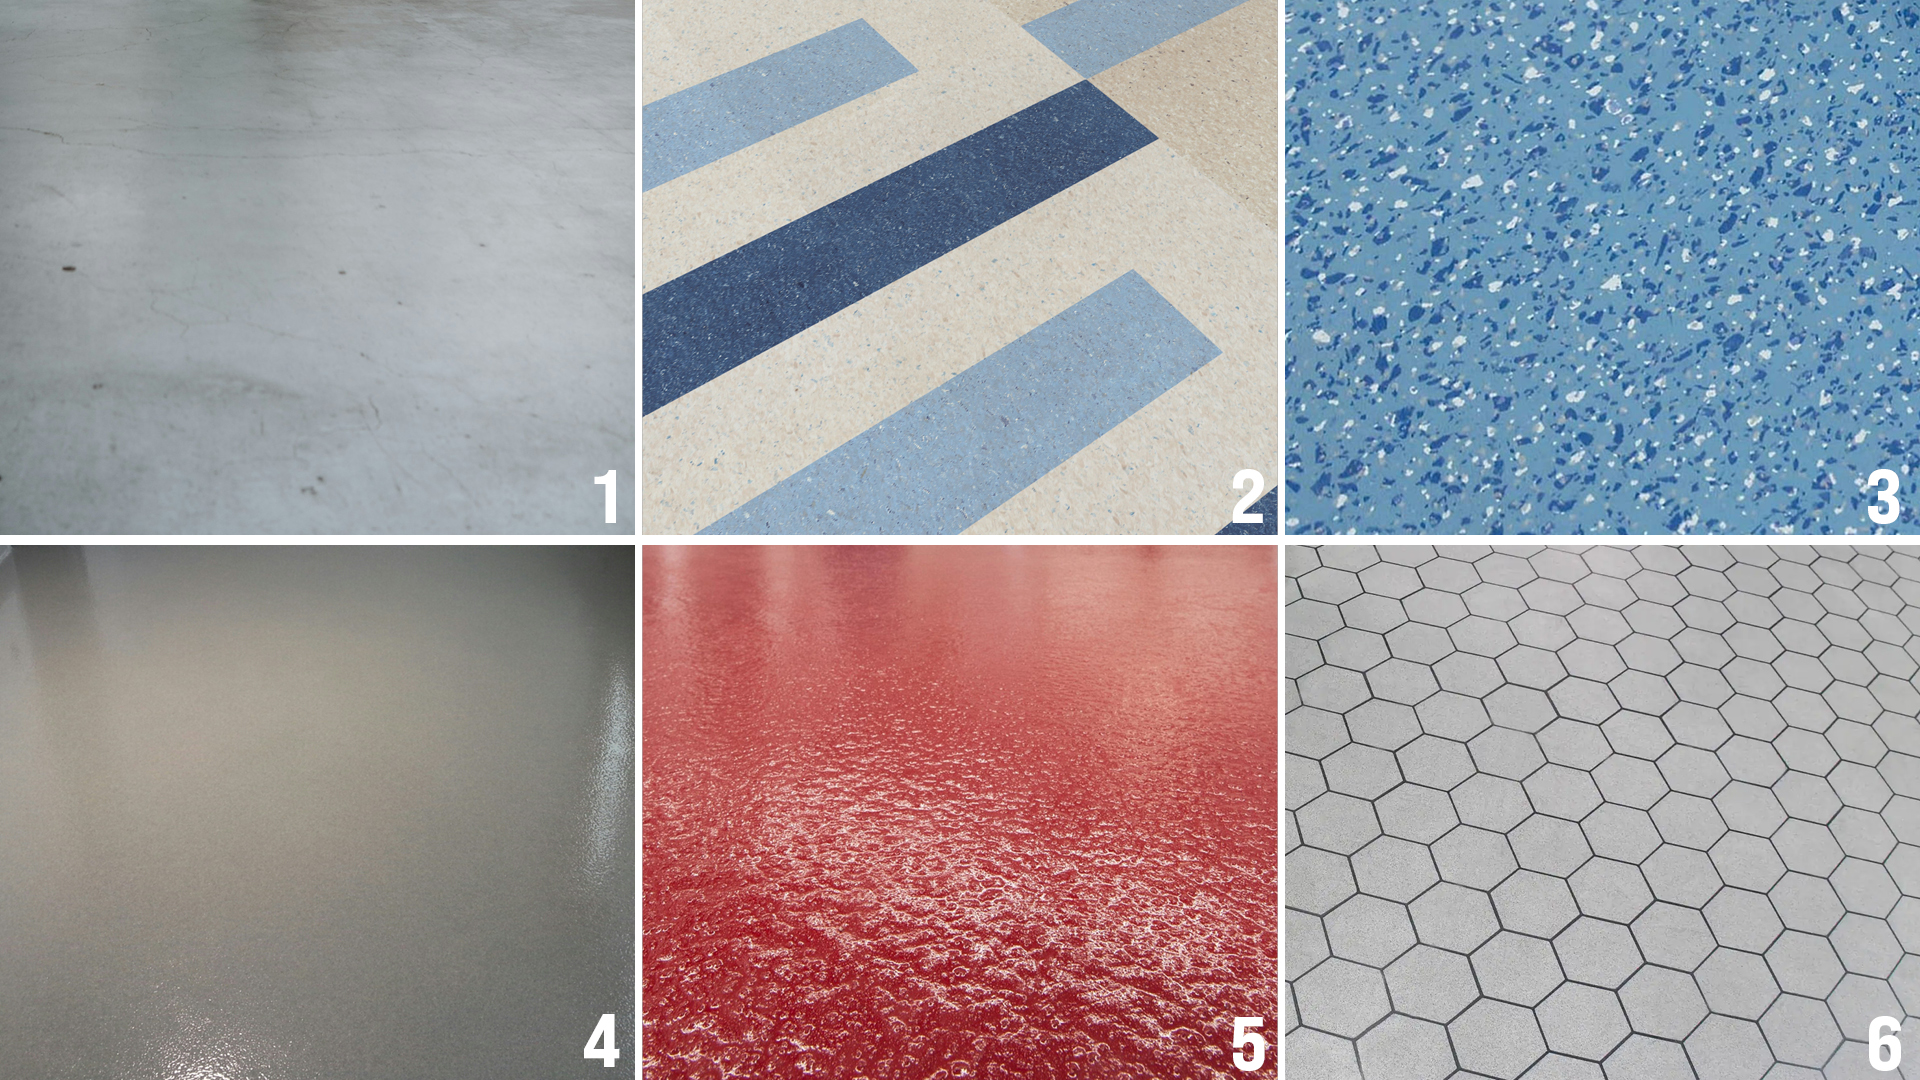
Concrete
Concrete has a lot going for it: a long revamp cycle, a clean monolithic aesthetic, excellent cleanability, and favorable life cycle costs. The problem is porosity. Untreated or poorly treated concrete is highly susceptible to chemical absorption, and once contamination gets into a slab, you have a significant problem. The key decision is film-forming versus penetrating treatments and neither choice matters much if demo and prep work aren’t done properly. Know your slab before you specify anything.
VCT and LVT
These tiles remain popular for a reason: low initial cost, design flexibility, and the ability to swap out individual tiles rather than refinish an entire floor. But these systems have real limits. The seams between tiles are potential sites for bacterial growth, and the adhesives and substrates beneath them are vulnerable to moisture and chemical exposure. They’re appropriate for BSL-1 and BSL-2 environments but push beyond that, and you’re asking more than the system can deliver.
Sheet Vinyl
Sheet vinyl earns its place in biosafety-sensitive labs because it’s essentially waterproof and highly cleanable. Color and finish options have expanded considerably, and the monolithic surface is easier to decontaminate than a tiled one. The catch is patching. Sheet vinyl doesn’t repair gracefully, and heat and chemical exposure can limit your options when damage occurs. If the lab’s use changes significantly down the road, sheet vinyl can become a constraint rather than an asset.
Epoxy and Resinous Flooring
This is the system most designers reach for in serious laboratory environments, and for good reason. Chemical resistance is excellent, cleaning is straightforward, and when properly installed, it’s a true monolithic surface. “When properly installed” is dependent on many factors, including close construction oversight. Slab conditions matter enormously. Substrate contamination, moisture vapor transmission, and inadequate surface preparation are the most common reasons these systems fail. The other thing worth knowing: epoxy is genuinely customizable in terms of color, sheen, and texture, but that customization only helps if the system build is matched to actual performance requirements.
Urethane
Matthew and I agree that Urethane flooring is the most underspecified robust option available. It offers the highest impact resistance of any fluid-applied floor, exceptional moisture and heat tolerance, and bio-based formulations for projects with sustainability goals. It’s slopeable, self-leveling, and particularly well-suited to vivarium environments and spaces where hot or caustic liquids are a regular reality. Tradeoffs like a tension between slip resistance and cleanability and a limited color palette are real, but manageable. If your lab has demanding thermal or chemical conditions, urethane deserves serious consideration.
Raised Floors and Ceramic Tile
Raised floors and ceramic tile are highly specialized systems that serve specific technical needs exceptionally well. Raised floors excel in clean room environments, while ceramic tile is well-suited to some pharmaceutical projects. Life cycle performance and durability can be excellent. But the initial cost is high, installation requires specialty contractors, and, critically, these systems constrain future flexibility in ways that can become expensive problems as lab uses evolve.
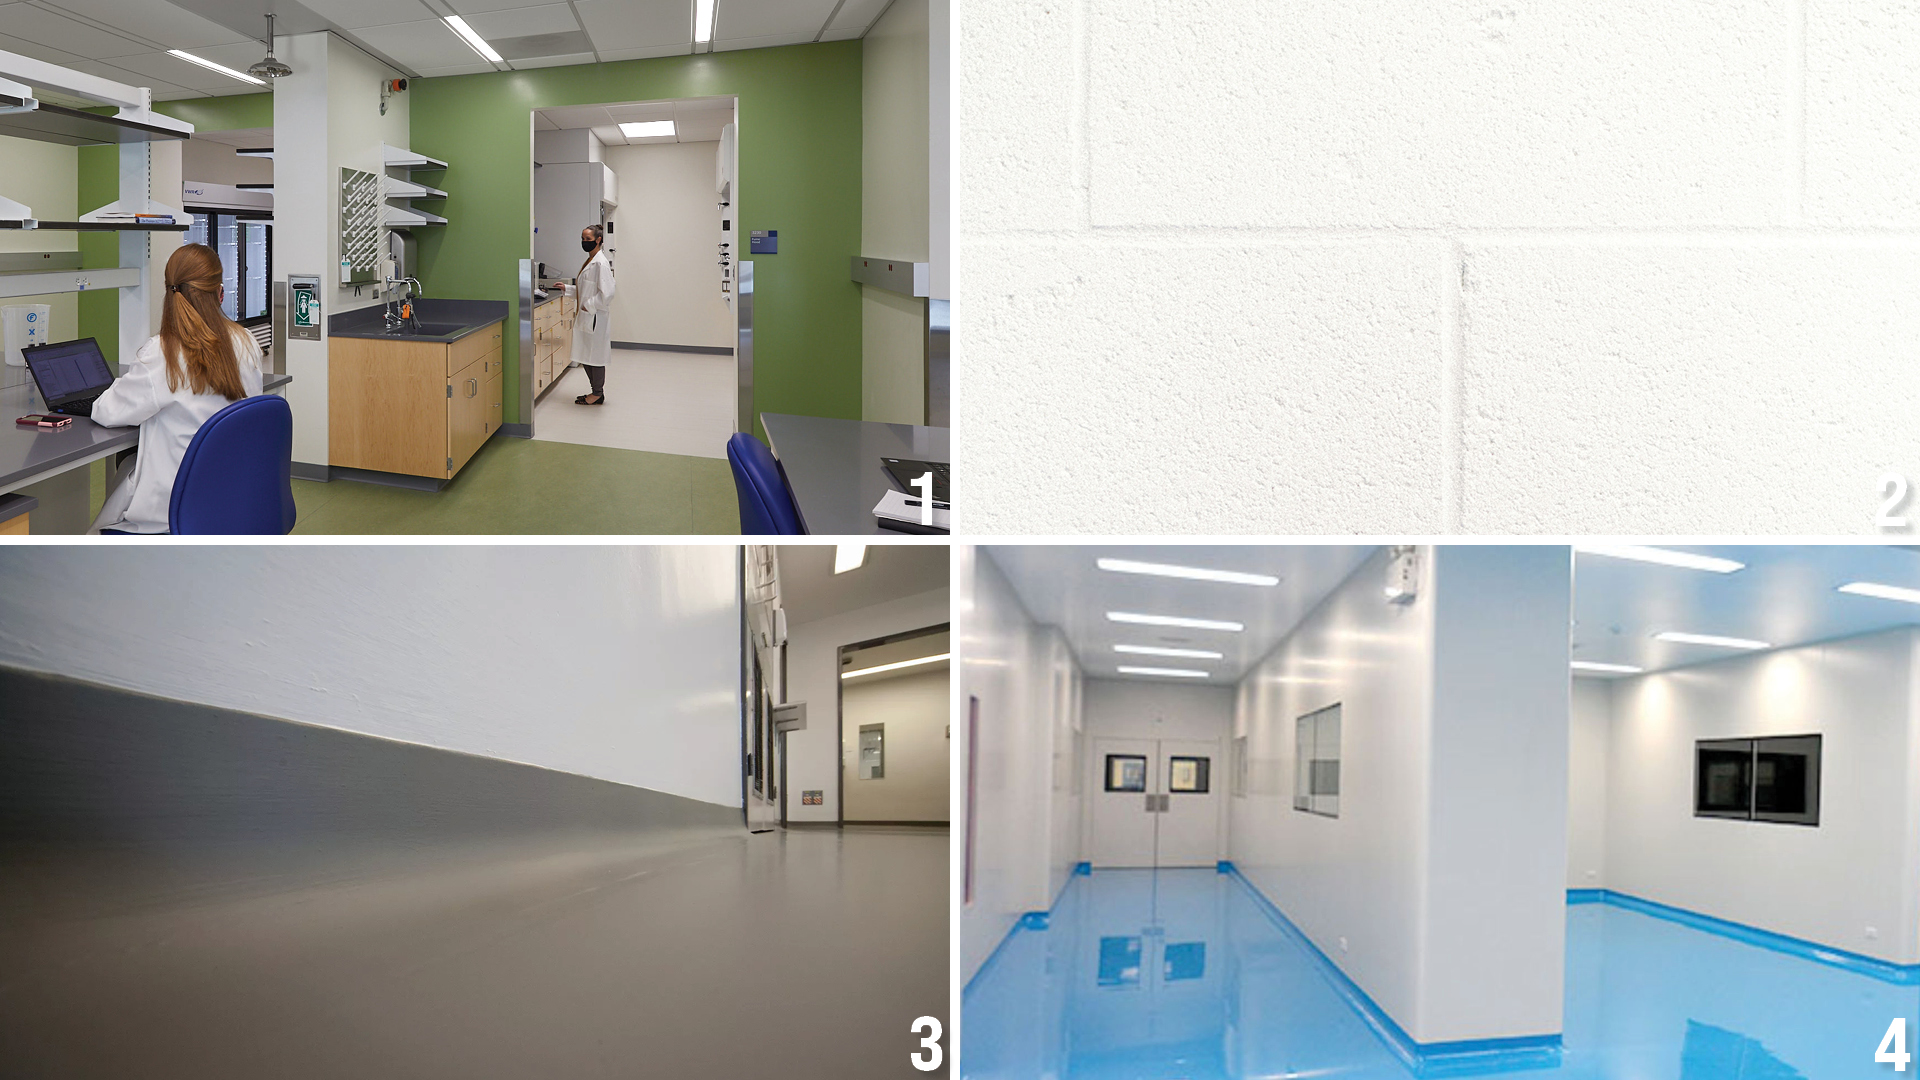
WALLS: MORE COMPLICATED THAN THEY LOOK
Wall finish selection often gets less attention than flooring, which is a mistake. The walls of a laboratory are in constant contact with the environment you’re trying to control: moisture, chemicals, biological materials, impact from equipment and carts. Getting the specification wrong is easy. Getting it right requires understanding what each system actually delivers.
Latex and Epoxy Paints
Latex and epoxy paints are the default starting point in most labs, and latex in particular has a lot going for it: easy reapplication, fast return to service, and low VOC content. The limitations are real, though. Latex paint offers limited resistance to moisture, impact, and chemicals. And in humid or wet environments, bacterial growth on latex-painted surfaces is a genuine concern. Epoxy paint addresses some of those weaknesses but introduces others: patching is difficult and rarely invisible, and the cost premium is only justified in areas where the performance gain actually matters. The lesson here is discipline. Use epoxy where it’s needed and resist the temptation to specify it everywhere as a precaution.
CMU Coatings
CMU (Concrete Masonry Unit) coatings bring structural, acoustic, and moisture-resistance benefits that are genuinely valuable in the right applications. The challenge is execution. Getting a smooth, cleanable finish on CMU requires careful construction specifications and diligent site observation. It’s not a system that tolerates shortcuts. And once CMU walls are in, long-term lab flexibility is constrained. Plan for that before you build.
Concrete Coatings and Drywall
Concrete coatings and drywall can deliver seamless, clean, impact-resistant surfaces but the quality of the outcome is directly tied to the starting condition of the substrate. Transitions and terminations are where these systems most commonly fail, and monolithic surfaces don’t forgive poor prep work. Understand your intent before you specify, and make sure the finish is matched to the actual use of the space.
Cleanroom Panels and Systems
Cleanroom panels and systems are purpose-built for high-performance environments: modular, technically compliant, designed to meet demanding standards. They perform exceptionally well in cleanrooms and in some vivarium environments. Outside of those applications, the high component cost, limited flexibility for other lab uses, and complexity around casework and in-wall utilities make them harder to justify. Patching and transitioning these systems when lab uses change can be surprisingly problematic.
Wall protection systems like bumper rails, corner guards, crash rails deserve more attention than they typically receive. They’re a low-cost intervention with genuine life cycle savings, protecting more expensive underlying finishes from the daily reality of carts, equipment, and traffic. Specify them intentionally, pay attention to the cleaning chemicals they’ll be exposed to, and they’ll pay for themselves many times over.
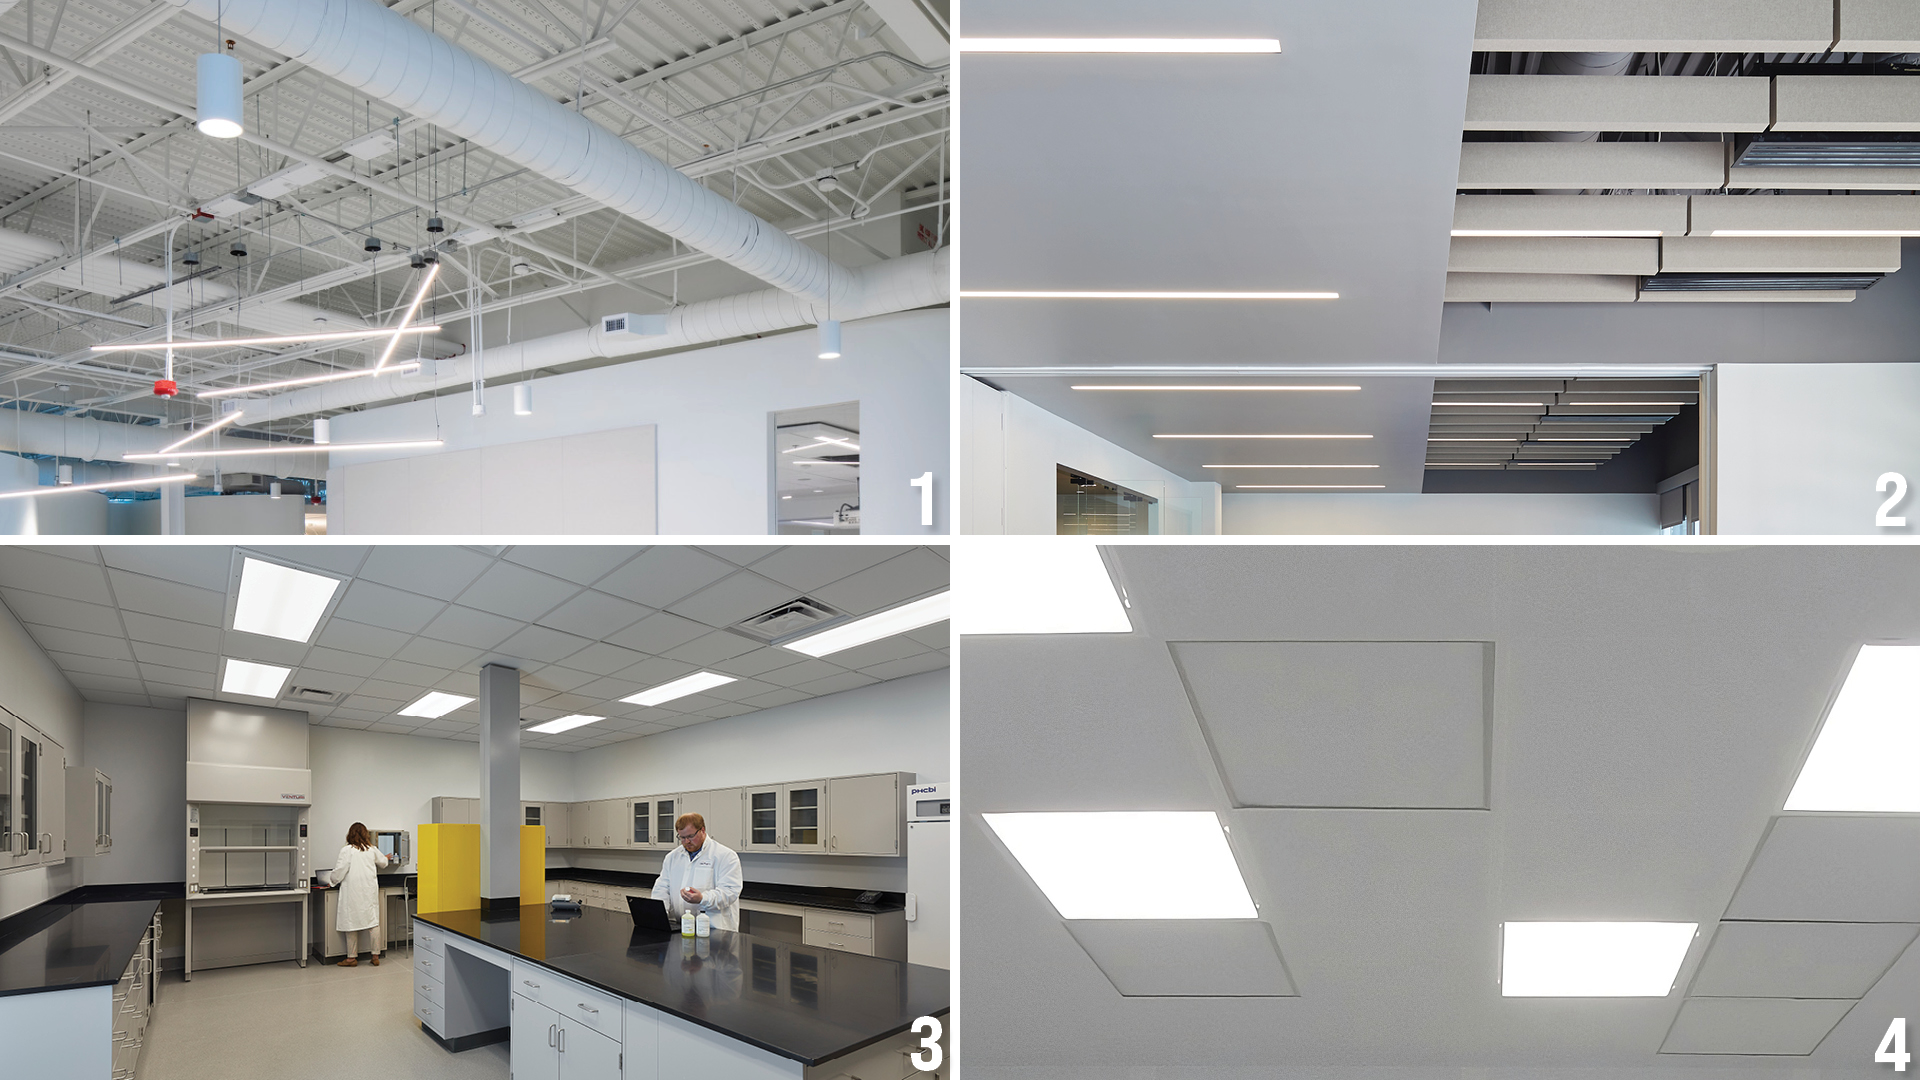
CEILINGS: THE SURFACE MOST OFTEN SPECIFIED BY DEFAULT
If flooring is underestimated, ceilings are as well. That’s a mistake, because ceiling selection has real implications for acoustics, washability, moisture management, maintenance access, and energy use.
Exposed Structure
Exposed structure has become a design signature in contemporary laboratory spaces, and the appeal is understandable: low cost, quick construction, easy maintenance access, and a flexibility that lets the space evolve. But design limits are real, acoustic performance is poor without supplementary treatment, and exposed structure is not appropriate for BSL-3 or BSL-4 environments. Before committing to the look, be honest about what your space actually needs.
Cloud and Partial Ceiling Systems
Cloud and partial ceiling systems can be striking in the right context, offering selective acoustic treatment and a visual layer of design interest while preserving access to the structure above. What they don’t always deliver is the cost savings often assumed. Higher HVAC loads, dust and debris accumulation on top of ceiling elements, and the genuine complexity of maintenance in these spaces can erode any first-cost advantage. They’re the right solution in the right place but that place is more limited than their current popularity might suggest.
Tile Systems
Tile systems are the industry standard for good reason. Life cycle cost, availability, flexibility, and replaceability make them the practical choice for the vast majority of laboratory spaces. The known failure modes are worth understanding: mold and moisture issues with older and lower-performing tile products, room pressurization effects on tiles in negative-pressure spaces, and access complications for specialty lay-in components. Specified correctly, tile systems offer excellent cost-to-performance value over the long term.
Gypsum Wallboard
Gypsum wallboard ceilings are durable, airtight, and highly cleanable (with the right finish). They’re the logical choice when biosafety or containment requirements demand a sealed overhead plane. The tradeoffs are higher cost than ACT, maintenance complexity (every HVAC and electrical penetration requires framed openings and access panels), and ongoing refinishing needs. They’re also in direct competition with cleanroom ceiling systems at the higher-performance end of the spectrum.
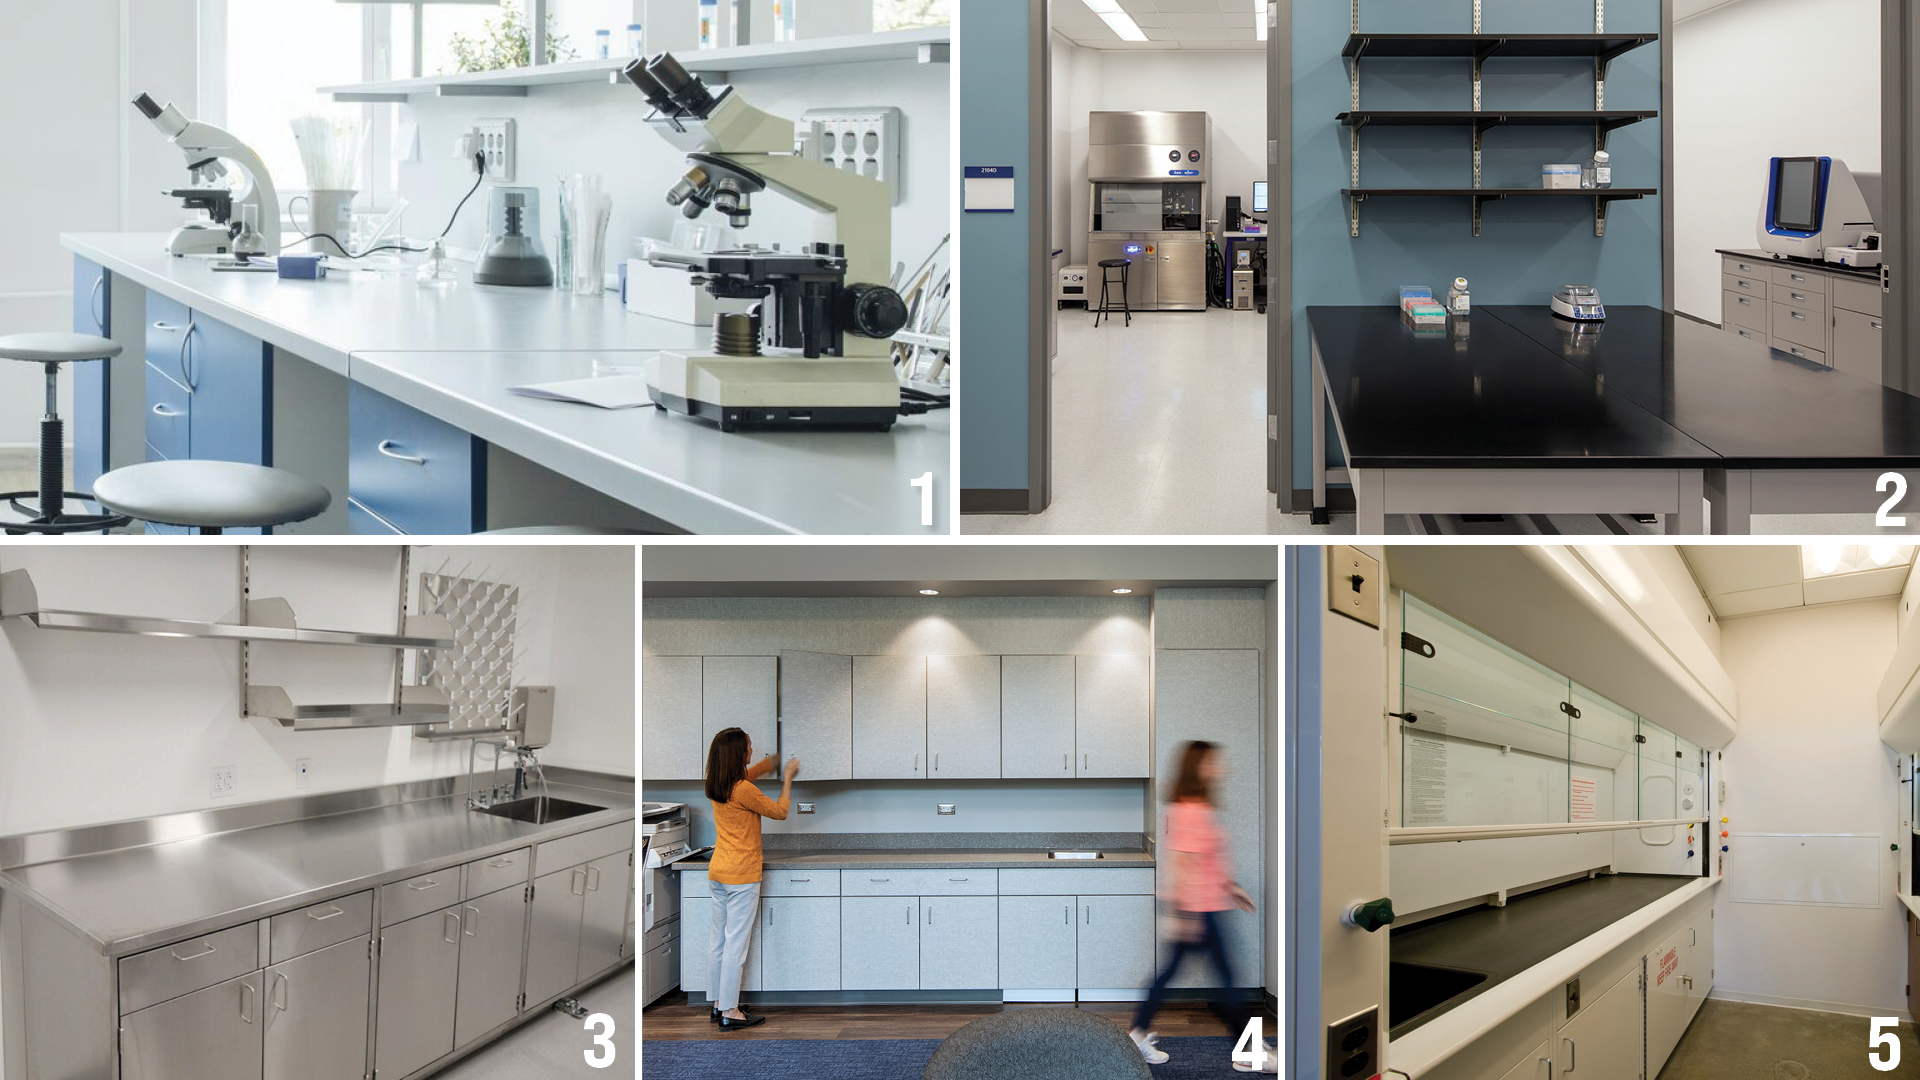
CASEWORK AND FUME HOODS: WHERE SCIENCE MEETS SURFACE
The surfaces closest to the work—countertops, cabinets, and fume hood interiors—are where finish failures have the most immediate consequences. They’re also where the gap between specified intent and field reality tends to be widest.
Epoxy Countertops
Epoxy countertops have been the “gold standard” in laboratory casework for decades, and the reputation is well-earned. Heat and chemical resistance are excellent, surfaces can be refinished rather than replaced, and the durability record is long. The limitations are cost, weight, and an aesthetic that reads as relatively utilitarian. Newer materials, including phenolic resin tops, are closing the performance gap, and the calculus is worth revisiting. The honest question to ask is: what does this bench actually need to withstand? Not every lab requires epoxy performance, and specifying it reflexively adds cost without adding value.
Laminate Countertops and Cabinets
Laminate countertops offer a compelling combination of cost, aesthetics, sustainability credentials, and procurement flexibility. In dry laboratory environments without heavy chemical exposure, they perform well and are far easier to replace when worn. The caution is in the details: moisture, heat, and certain chemicals can compromise laminate in ways that aren’t always visible until significant damage is done. Know the chemistry before you specify the top.
Other Material Countertops
Specialty countertop materials such as stainless steel, polypropylene, electrostatic dissipative (ESD) surfaces, and wood each serve specific applications well. Stainless is ideal for wet labs and sink surrounds but is expensive and sometimes difficult to weld if that is required. ESD surfaces are essential for electronics work. Wood has a place in engineering and production labs but highly susceptible to moisture and chemicals. The takeaway for any specialty material is the same: choose for the application, write tight specifications, and verify during construction.
Cabinets
Cabinets get less attention than countertops but matter just as much for long-term performance. Wood cabinets are specified less frequently in laboratory environments since moisture and chemical exposure are genuine concerns, and hardware performance over time can be problematic. Metal cabinets dominate wet lab environments for good reason, but they’re not without issues: moisture infiltration around sinks, chemical and heat exposure, and cost and procurement lead times all deserve consideration. Whatever system you specify, chemical and temperature awareness should guide the decision.
Fume Hoods
Fume hoods may be equipment rather than finish, but the interior surfaces of a fume hood are a finish story. The past 30 years have brought significant improvements in safety and durability, but proper use, proper placement, decontamination protocols, and chemical liner selection remain critical factors that no amount of material improvement can substitute for. Cleaning products matter, too. Incompatible chemicals can degrade hood interiors in ways that compromise both performance and safety. As materials and technology continue to evolve, the fundamentals haven’t changed: maintain what you have and match your liner specification to your actual chemical list.
THE TAKEAWAY
What connects all of these systems—floors, walls, ceilings, casework—is the same underlying truth: finish selection is a lifecycle decision, not a first-cost decision. The material that looks like the economical choice on day one often isn’t when you factor in maintenance, replacement, and the cost of getting it wrong.
The other constant is specificity. Generic specifications produce generic outcomes. Understanding your lab’s actual chemistry, biosafety level, operational patterns, and anticipated future uses is what separates a finish that performs from one that becomes a problem.
If your team is planning a new laboratory or navigating a renovation and wants to think through these decisions carefully, we’d welcome the conversation.